INDIGO FutureGateway
Warning
FutureGateway deployment requires https and java 8. Currently the script exploits openjdk 7. Se section Update to Java 8 - Appendix A.
To correctly setup the FGW portal follow the instruction in the Ubuntu LTS 14.04 Server section here as super user:
# IP=$(ifconfig | grep  -A 2 eth0 | grep inet\ addr | awk -F':' '{ print $2 }' | awk '{ print $1 }' | xargs echo)

# echo "$IP    futuregateway" >> /etc/hosts

# adduser --disabled-password --gecos "" futuregateway

# mkdir -p /home/futuregateway/.ssh

# chown futuregateway:futuregateway /home/futuregateway/.ssh

# wget https://github.com/indigo-dc/PortalSetup/raw/master/Ubuntu_14.04/fgSetup.sh

# chmod +x fgSetup.sh

# cat /dev/zero | ssh-keygen -q -N ""

# cat /root/.ssh/id_rsa.pub >> /home/futuregateway/.ssh/authorized_keys

# echo "#FGSetup remove the following after installation" >> /etc/sudoers

# echo "ALL  ALL=(ALL) NOPASSWD:ALL" >> /etc/sudoers
You can edit the fgSetup.sh script to point to specific FGW release or branch.
We are currently using master branch.
GITBASE=https://github.com/indigo-dc                   # GitHub base repository endpoint
GITBASERAW=https://raw.githubusercontent.com/indigo-dc # GitHub base for raw content
GITPORTALSETUP_NAME="PortalSetup"                      # PortalSetup git path name
GITPORTALSETUP_CLONE="PortalSetup.git"                 # PortalSetup clone name
GITPORTALSETUP_TAG="master"                            # PortalSetup tag name
GITFGAPISERVER_NAME="fgAPIServer"                      # fgAPIServer git path name
GITFGAPISERVER_CLONE="fgAPIServer.git"                 # fgAPIServer clone name
GITFGAPISERVER_TAG="master"                            # fgAPIServer tag name
GITFGAPISERVERDAEMON_NAME="APIServerDaemon"            # APIServerDaemon git path name
GITFGAPISERVERDAEMON_CLONE="APIServerDaemon.git"       # APIServerDaemon clone name
GITFGAPISERVERDAEMON_TAG="master"                      # APIServerDaemin clone tag name
Then:
# ./fgSetup.sh futuregateway futuregateway <your ssh port> $(cat /root/.ssh/id_rsa.pub)
The ssh port is, usually, the 22.
Warning
FutureGateway token authentication requires https. Here, we are going to use Let’s Encrypt certificates, as examble. A quick guide is available here.
Portal configuration
Start the portal:
# /etc/init.d/futuregateway start
The portal will available at http(s)://<your_ip_address>:8080
Note
FGW (re)start take a while!
Login with the mail configured during the wizard and test as password. Then set your new password and recovery question.
Apache configuration
https is mandatory for FutureGateway Token authentication.
Enalble http_proxy and ssl modules on apache2
a2enmod ssl
a2enmod proxy_http
Port 443 must be opened.
In /etc/apach2/sites-available/ create your futuregateway.conf file, setting
ServerName <your_server_name>

...

## SSL directives
SSLEngine on
SSLCertificateFile /path/to/cert.pem
SSLCertificateKeyFile /path/to/key.pem
SSLCertificateChainFile /path/to/chain.pem

...
then enable FGW:
a2ensite futuregateway.conf
and reload apache:
# service apache2 reload
Add to FGW configuration file portal-ext.properties the following lines:
web.server.protocol=https
web.server.https.port=443
and restart FGW:
# /etc/init.d/futuregateway restart
Note
To create your signed cetificate with Let’s Encrypt: https://github.com/maricaantonacci/slam/blob/master/gitbook/create-custom-keystore.md
IAM integration
Iam portlets for the FGW portal are available on github: https://github.com/mtangaro/fgw-elixir-italy/tree/master/iam-modules
Put the portlets in the /home/futuregateway/FutureGateway/deploy/, FGW will upload them automatically, moving them in /home/futuregateway/FutureGateway/osgi/modules/.
You can follow this instructions to set it up: https://github.com/indigo-dc/LiferayPlugIns/blob/master/doc/admin.md.
The option javascript.fast.load=false has to be set in /home/futuregateway/FutureGateway/portal-ext.properties.
Administrator portlet
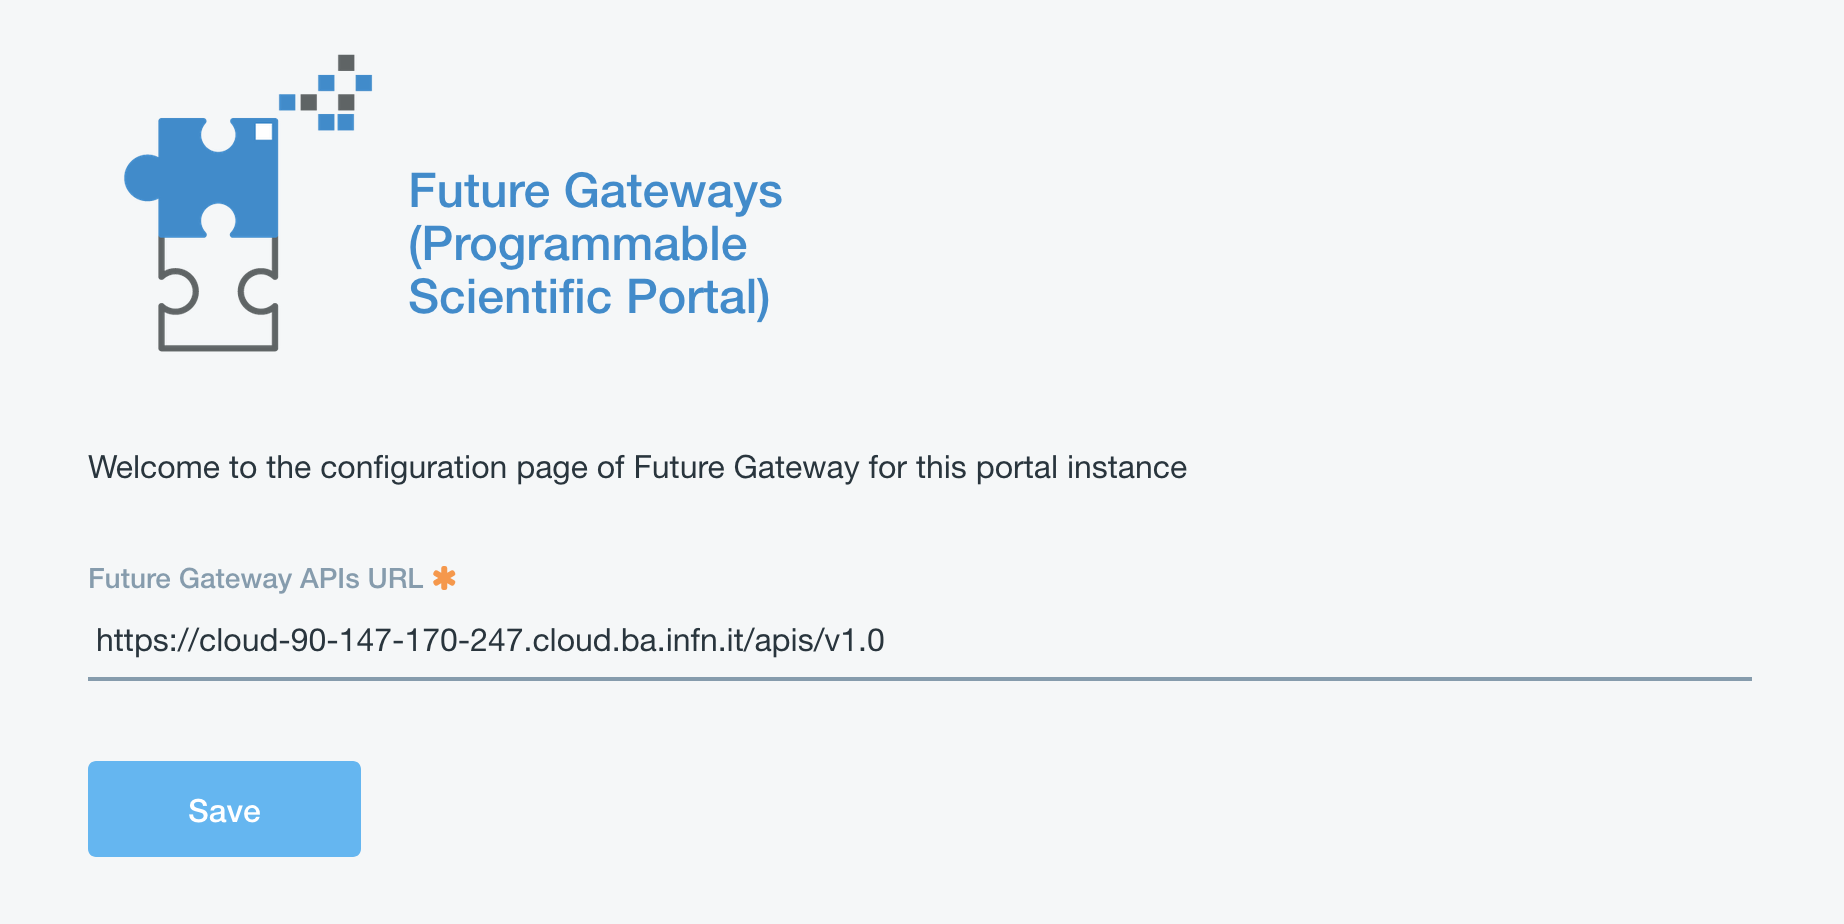
The administrator portlet is here: https://github.com/mtangaro/fgw-elixir-italy/tree/master/admin-modules
Once uploaded, the Future Gateway APIs URL is https://hostname/apis/v1.0.
The next thing is the configuration of PTV (Portal Token Validator). This is a service which FG API server uses for token validation.
Specific Liferay user and role are needed to exploit PTV.
Note
This step is not mandatory, since you can still configure your portal owner for token validation, since it has all required permissions and is registerd to IAM.
But, if you change IAM client you have to create a new user and change the PTV configuration. This configuration avoid this.
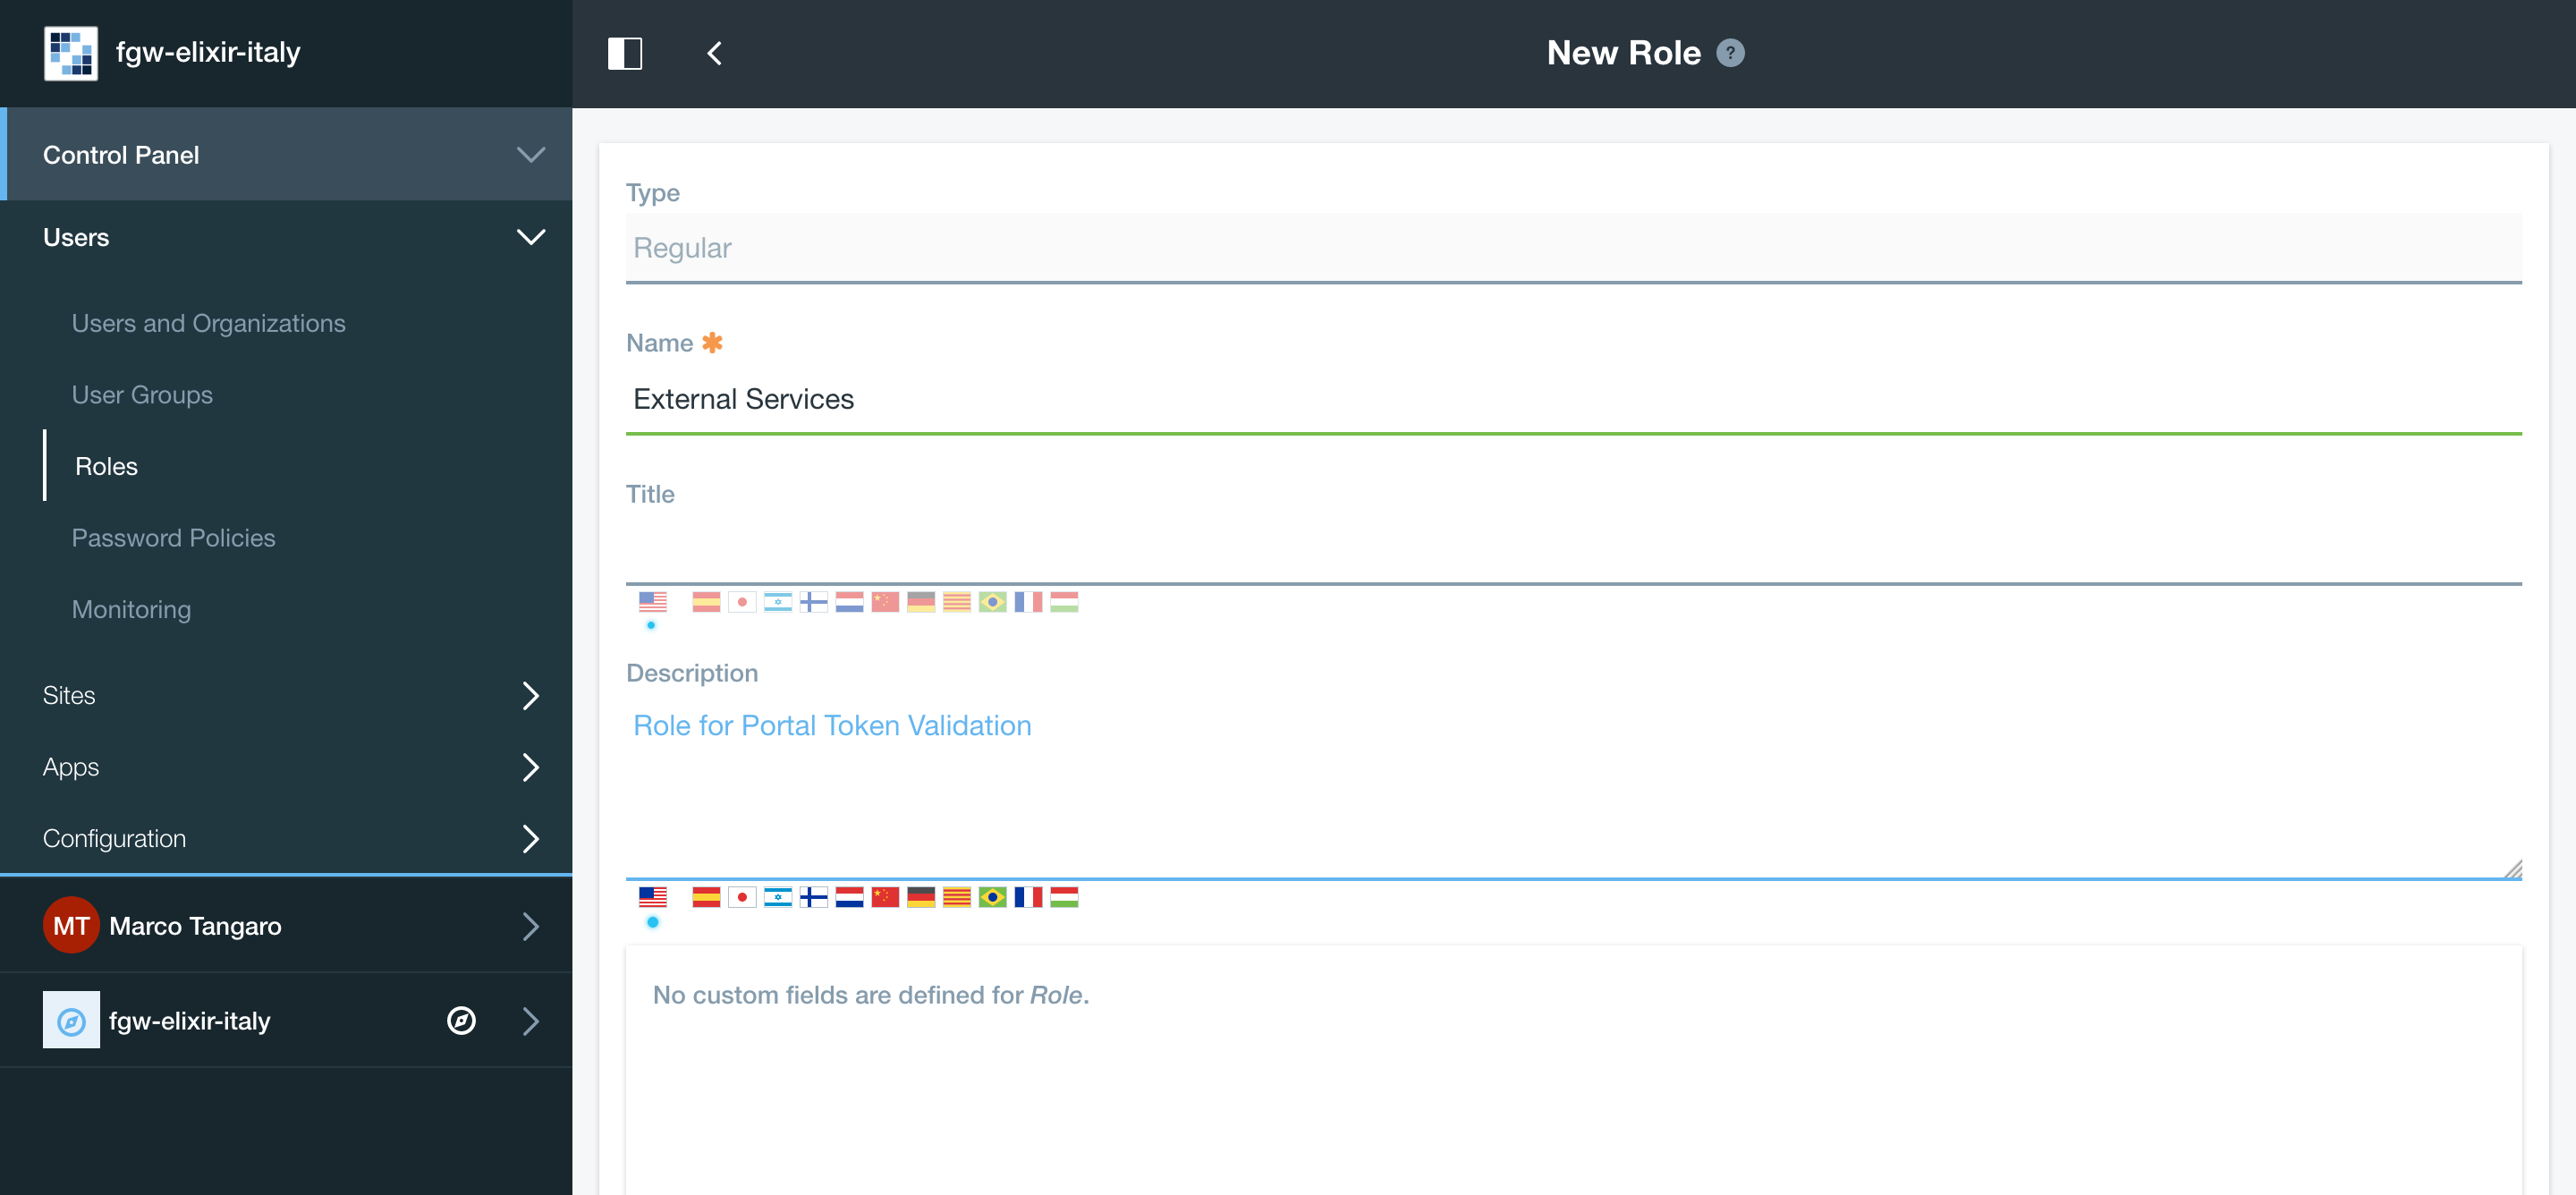
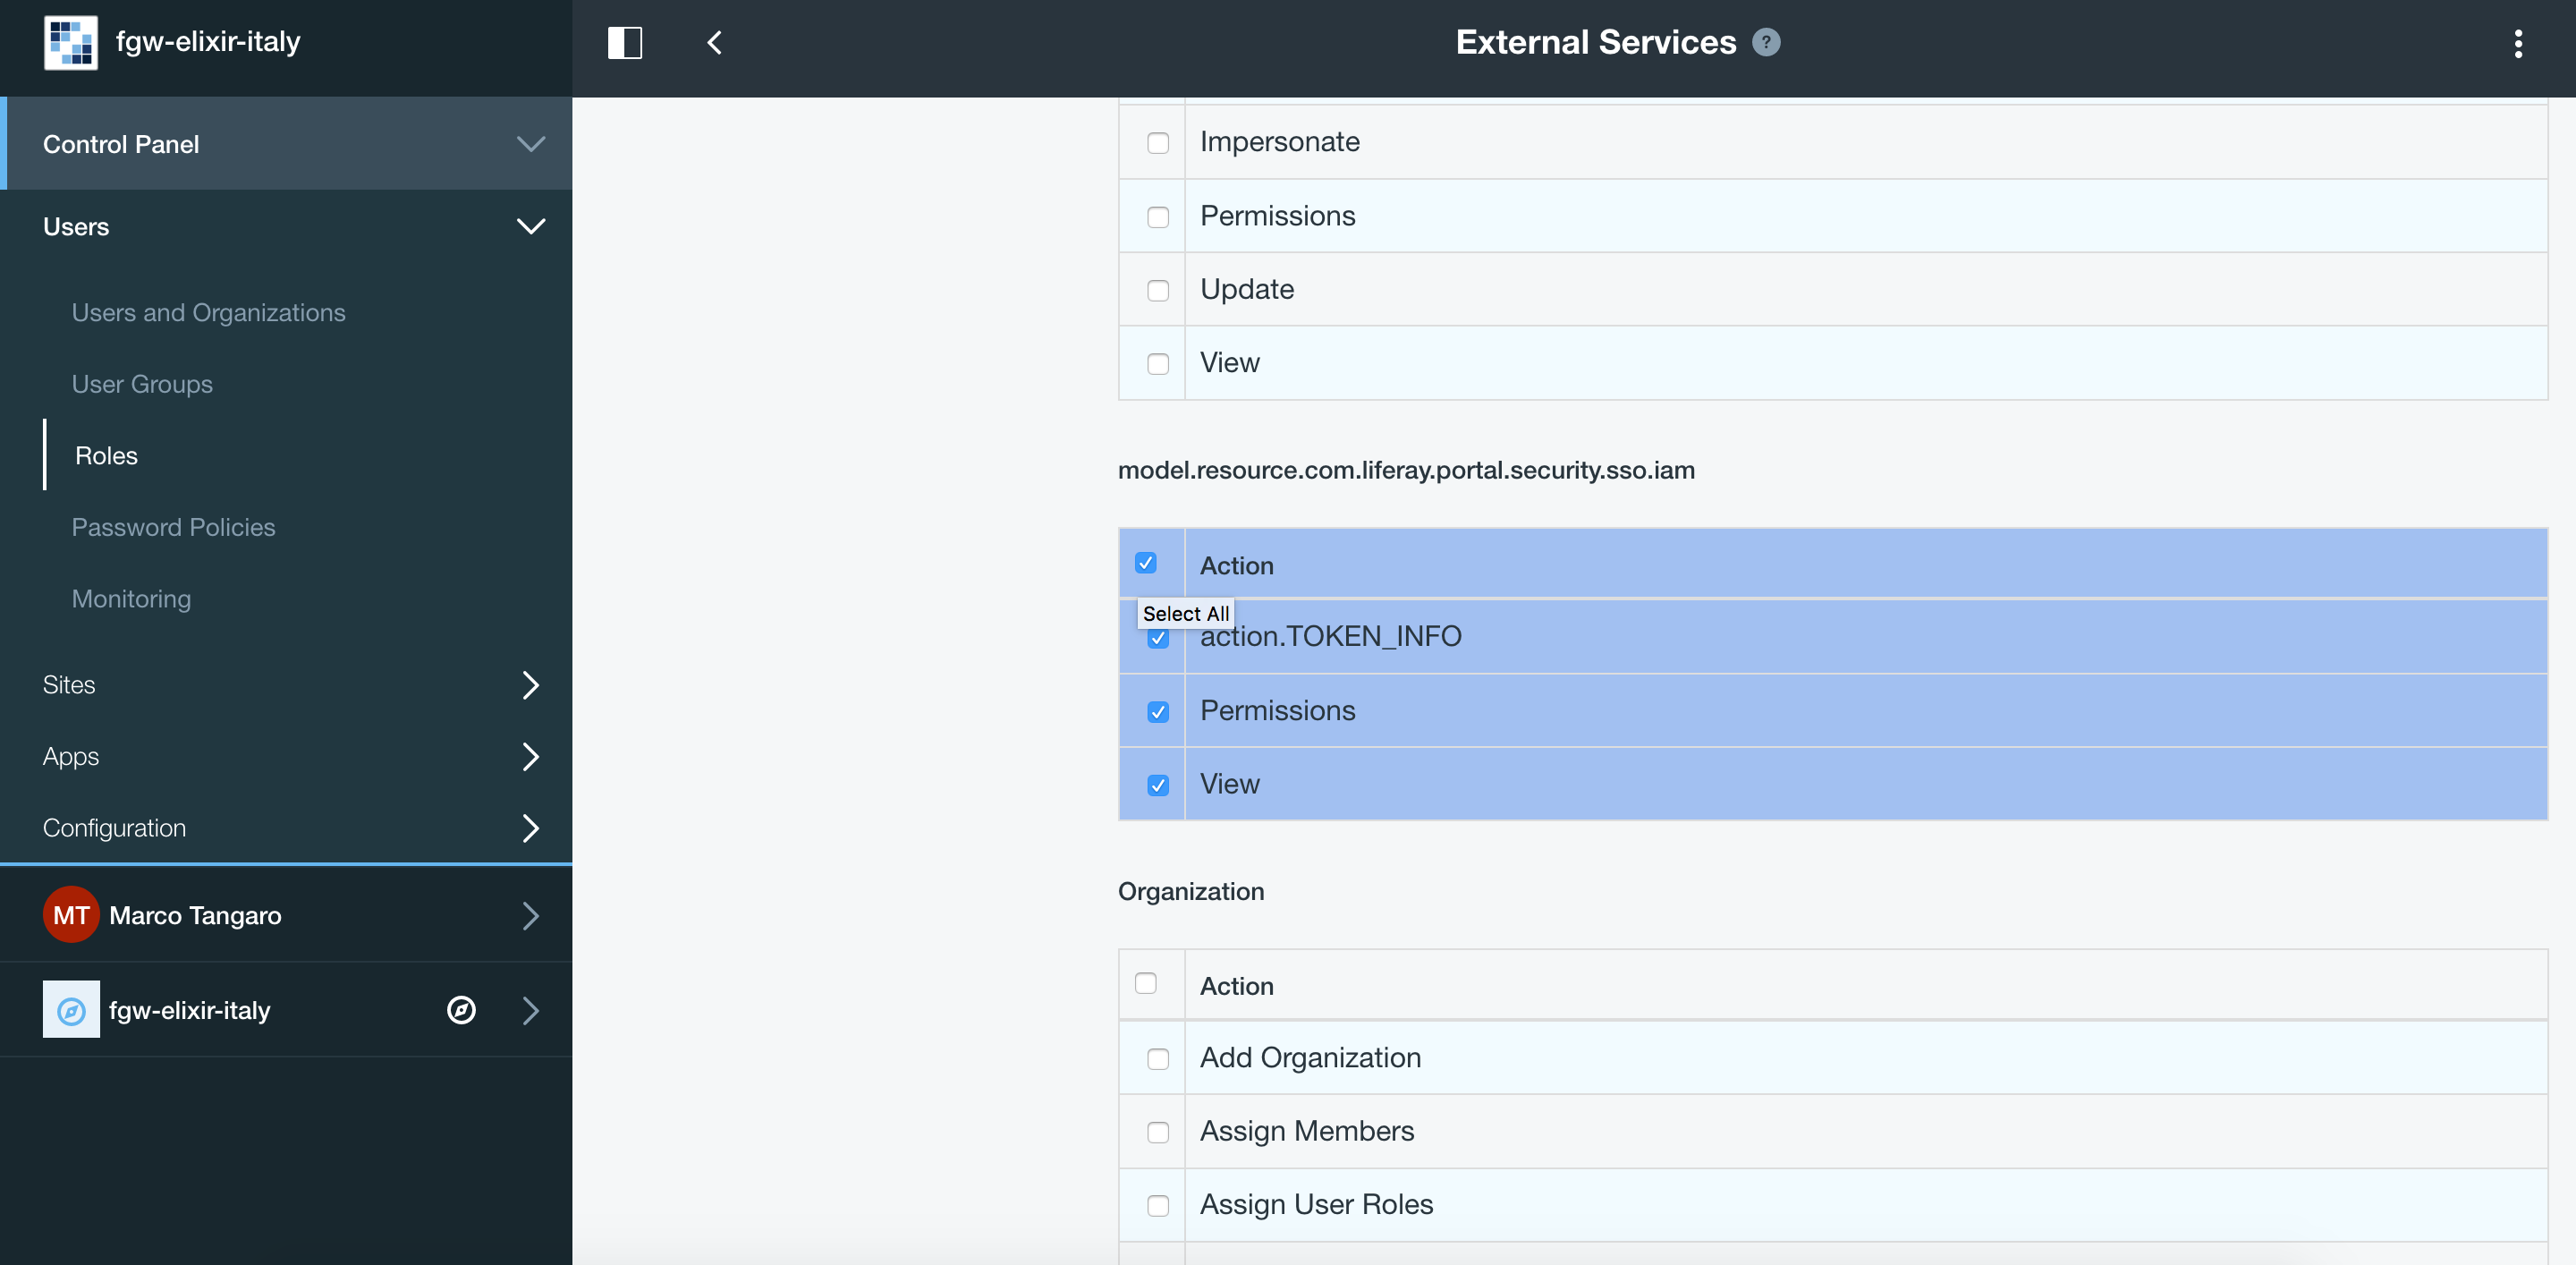
Create a new Role named External Services and give it IAM token permissions:
Create a new user (not a IAM user, just register it using the Sign-in liferay module and enable it).
Then assign the new Role External Services to the new user: Users and Organizations -> User Information -> Roles -> Select External Services and save.
To configure PTV you have to modify FutureGateway/fgAPIServer/fgapiserver.conf [1] by the following options:
fgapisrv_ptvendpoint= https://hostname/api/jsonws/iam.token/get-token-info
fgapisrv_ptvuser    = [...]
fgapisrv_ptvpass    = [...]
Moreover you have to configure FutureGateway/apache-tomcat-8.0.36/webapps/APIServerDaemon/WEB-INF/classes/it/infn/ct/ToscaIDC.properties [2] with:
fgapisrv_frontend   = https://hostname/apis/v1.0
fgapisrv_ptvtokensrv= https://hostname/api/jsonws/iam.token/get-token
fgapisrv_ptvendpoint= https://hostname/api/jsonws/iam.token
fgapisrv_ptvuser    = [...]
fgapisrv_ptvpass    = [...]
ptvuser and ptvpass corresponds to user email and password of a FGW user with the right permissions for token validations.
Warning
After changing [1] restart of Apache # service apache2 restart, and after [2] restart of Tomcat # service futuregateway restart.
To validate if your PTV service is working, you can do the following:
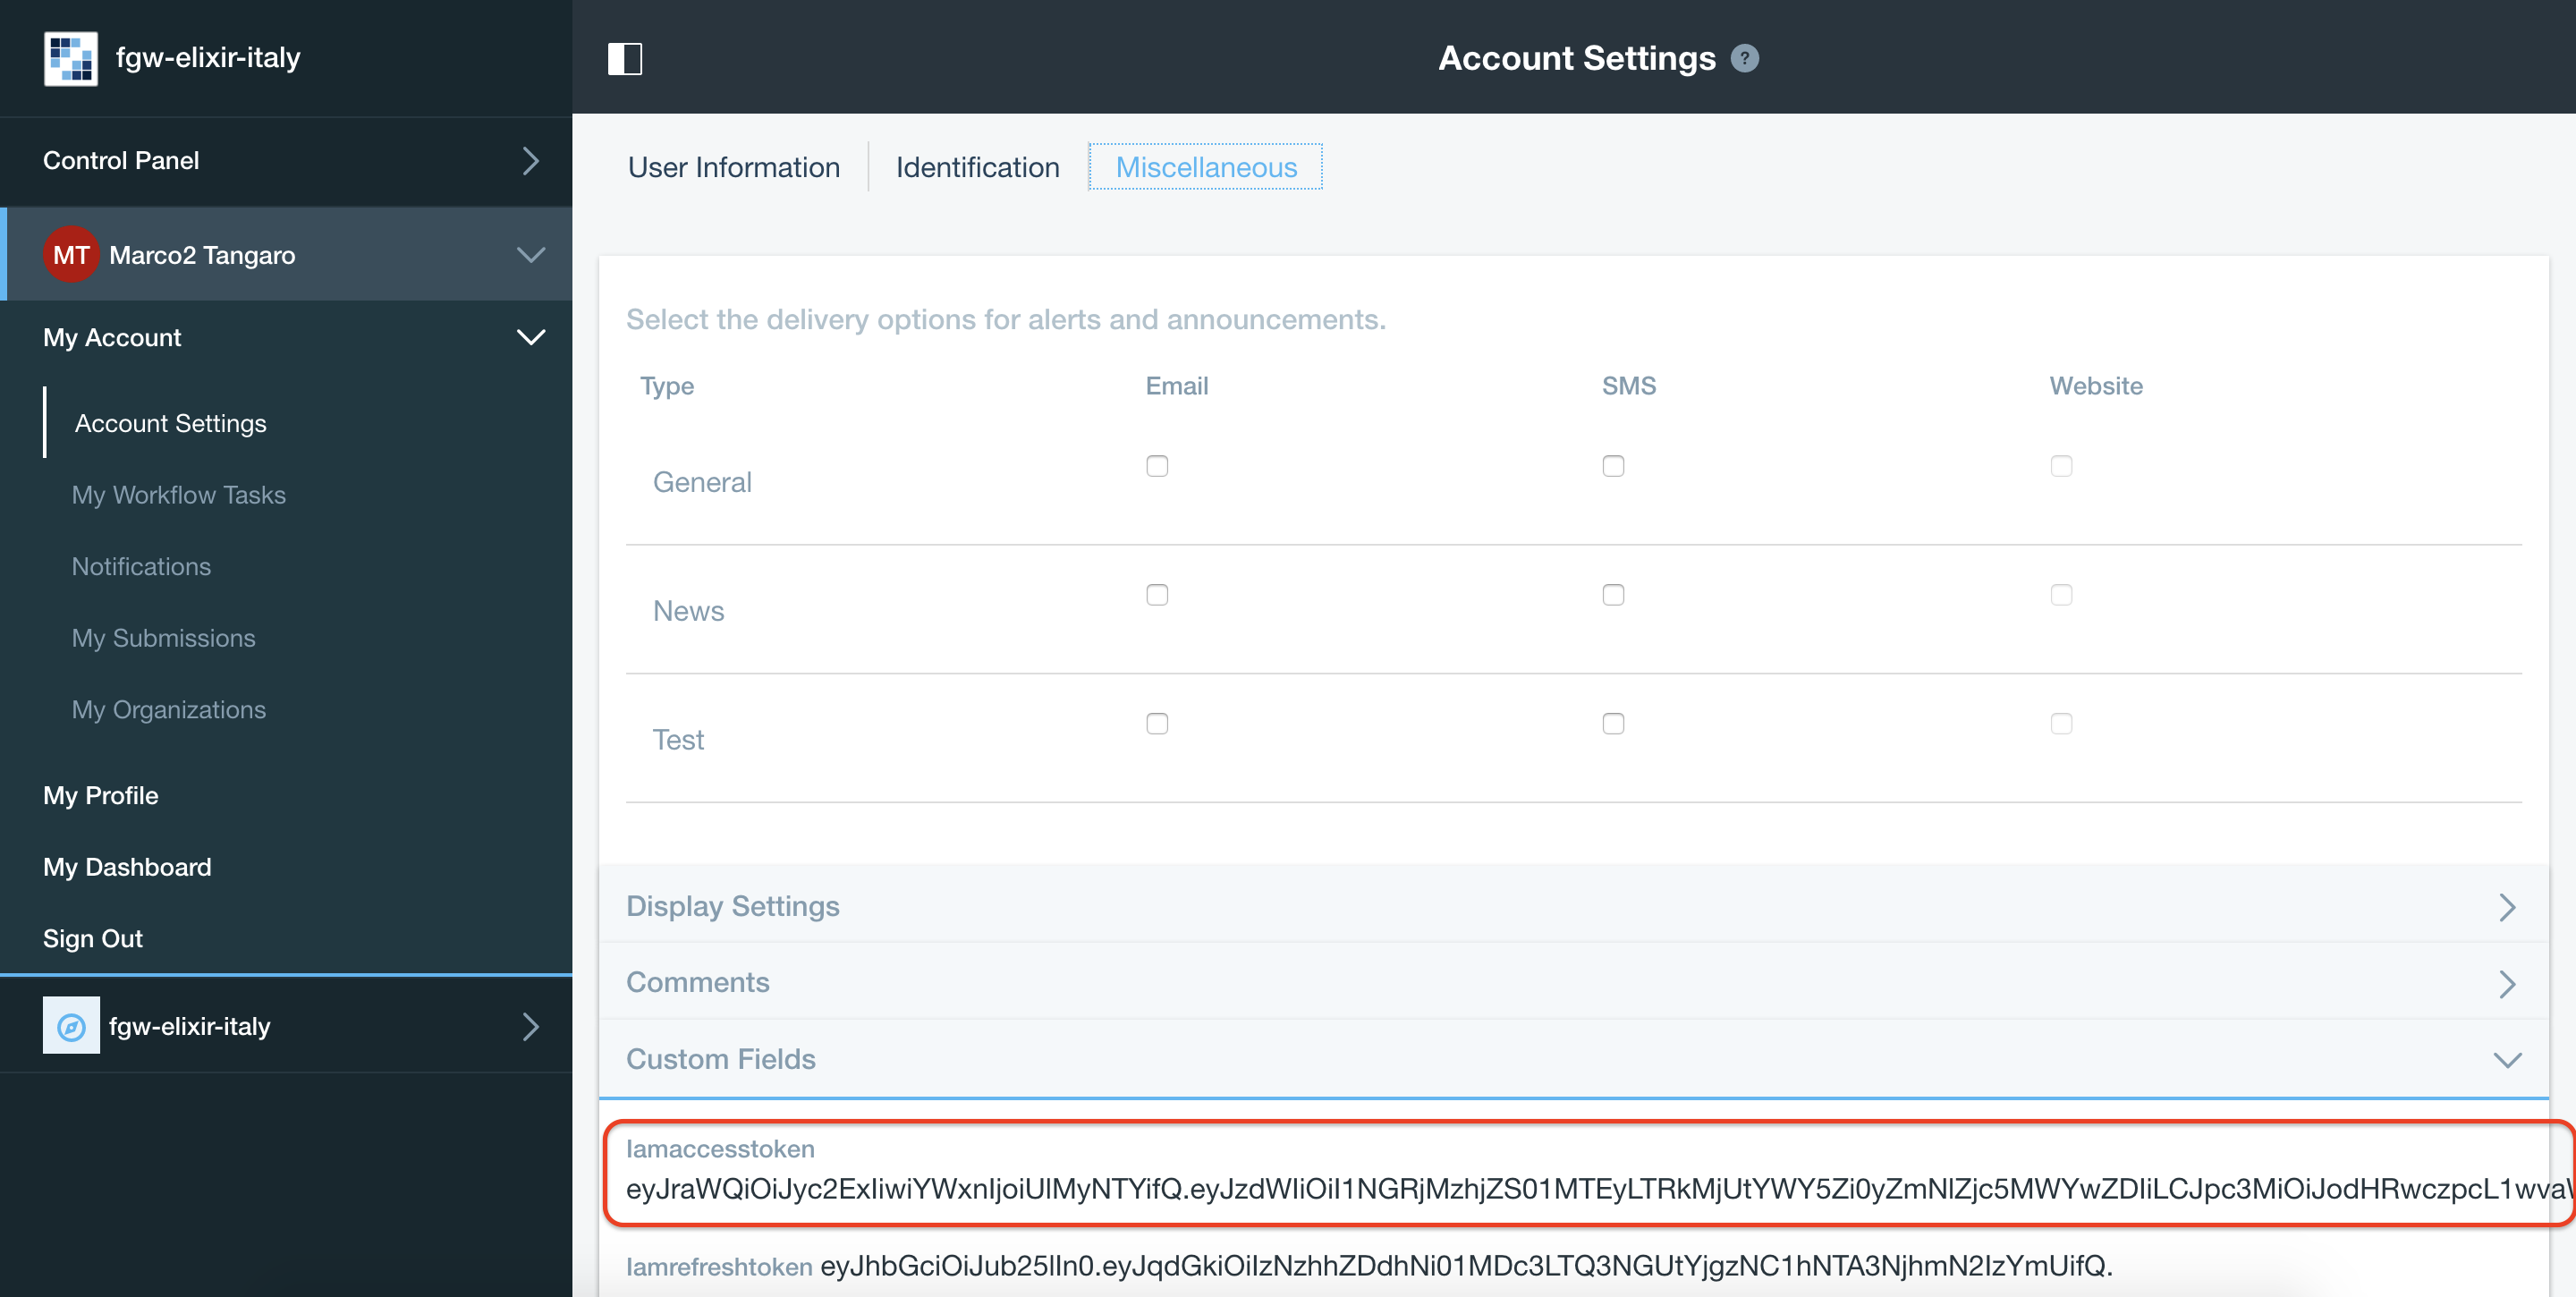
Visit https://jwt.io and copy-paste your IAM token. Token is stored in Your User Name -> Account Settings -> Miscellaneus -> Iamaccesstoken
In the decoded payload, you will find your subject:
321f0ea3-4aab-46f7-accf-f645cd9d3629
Use the PTV web service directly:
$ export PTV_USER= ***
$ export PTV_PASS= ***
$ export SUBJECT=321f0ea3-4aab-46f7-accf-f645cd9d3629

$ curl -u "$PTV_USER:$PTV_PASS"\
       -d "subject=$SUBJECT"\
       https://hostname/api/jsonws/iam.token/get-token
To test if the FGW API server is authenticating you correctly, you can do the following:
$ curl https://hostname/apis/v1.0/applications
This should show ‘401 Unauthorized’, so do the following:
export TOKEN = IAM_token_from_FGW_portal

$ curl -H "Authorization: Bearer $TOKEN" https://hostname.cloud.ba.infn.it/apis/v1.0/applications
If FG API server is configured correctly, you will get JSON description of your FG applications.
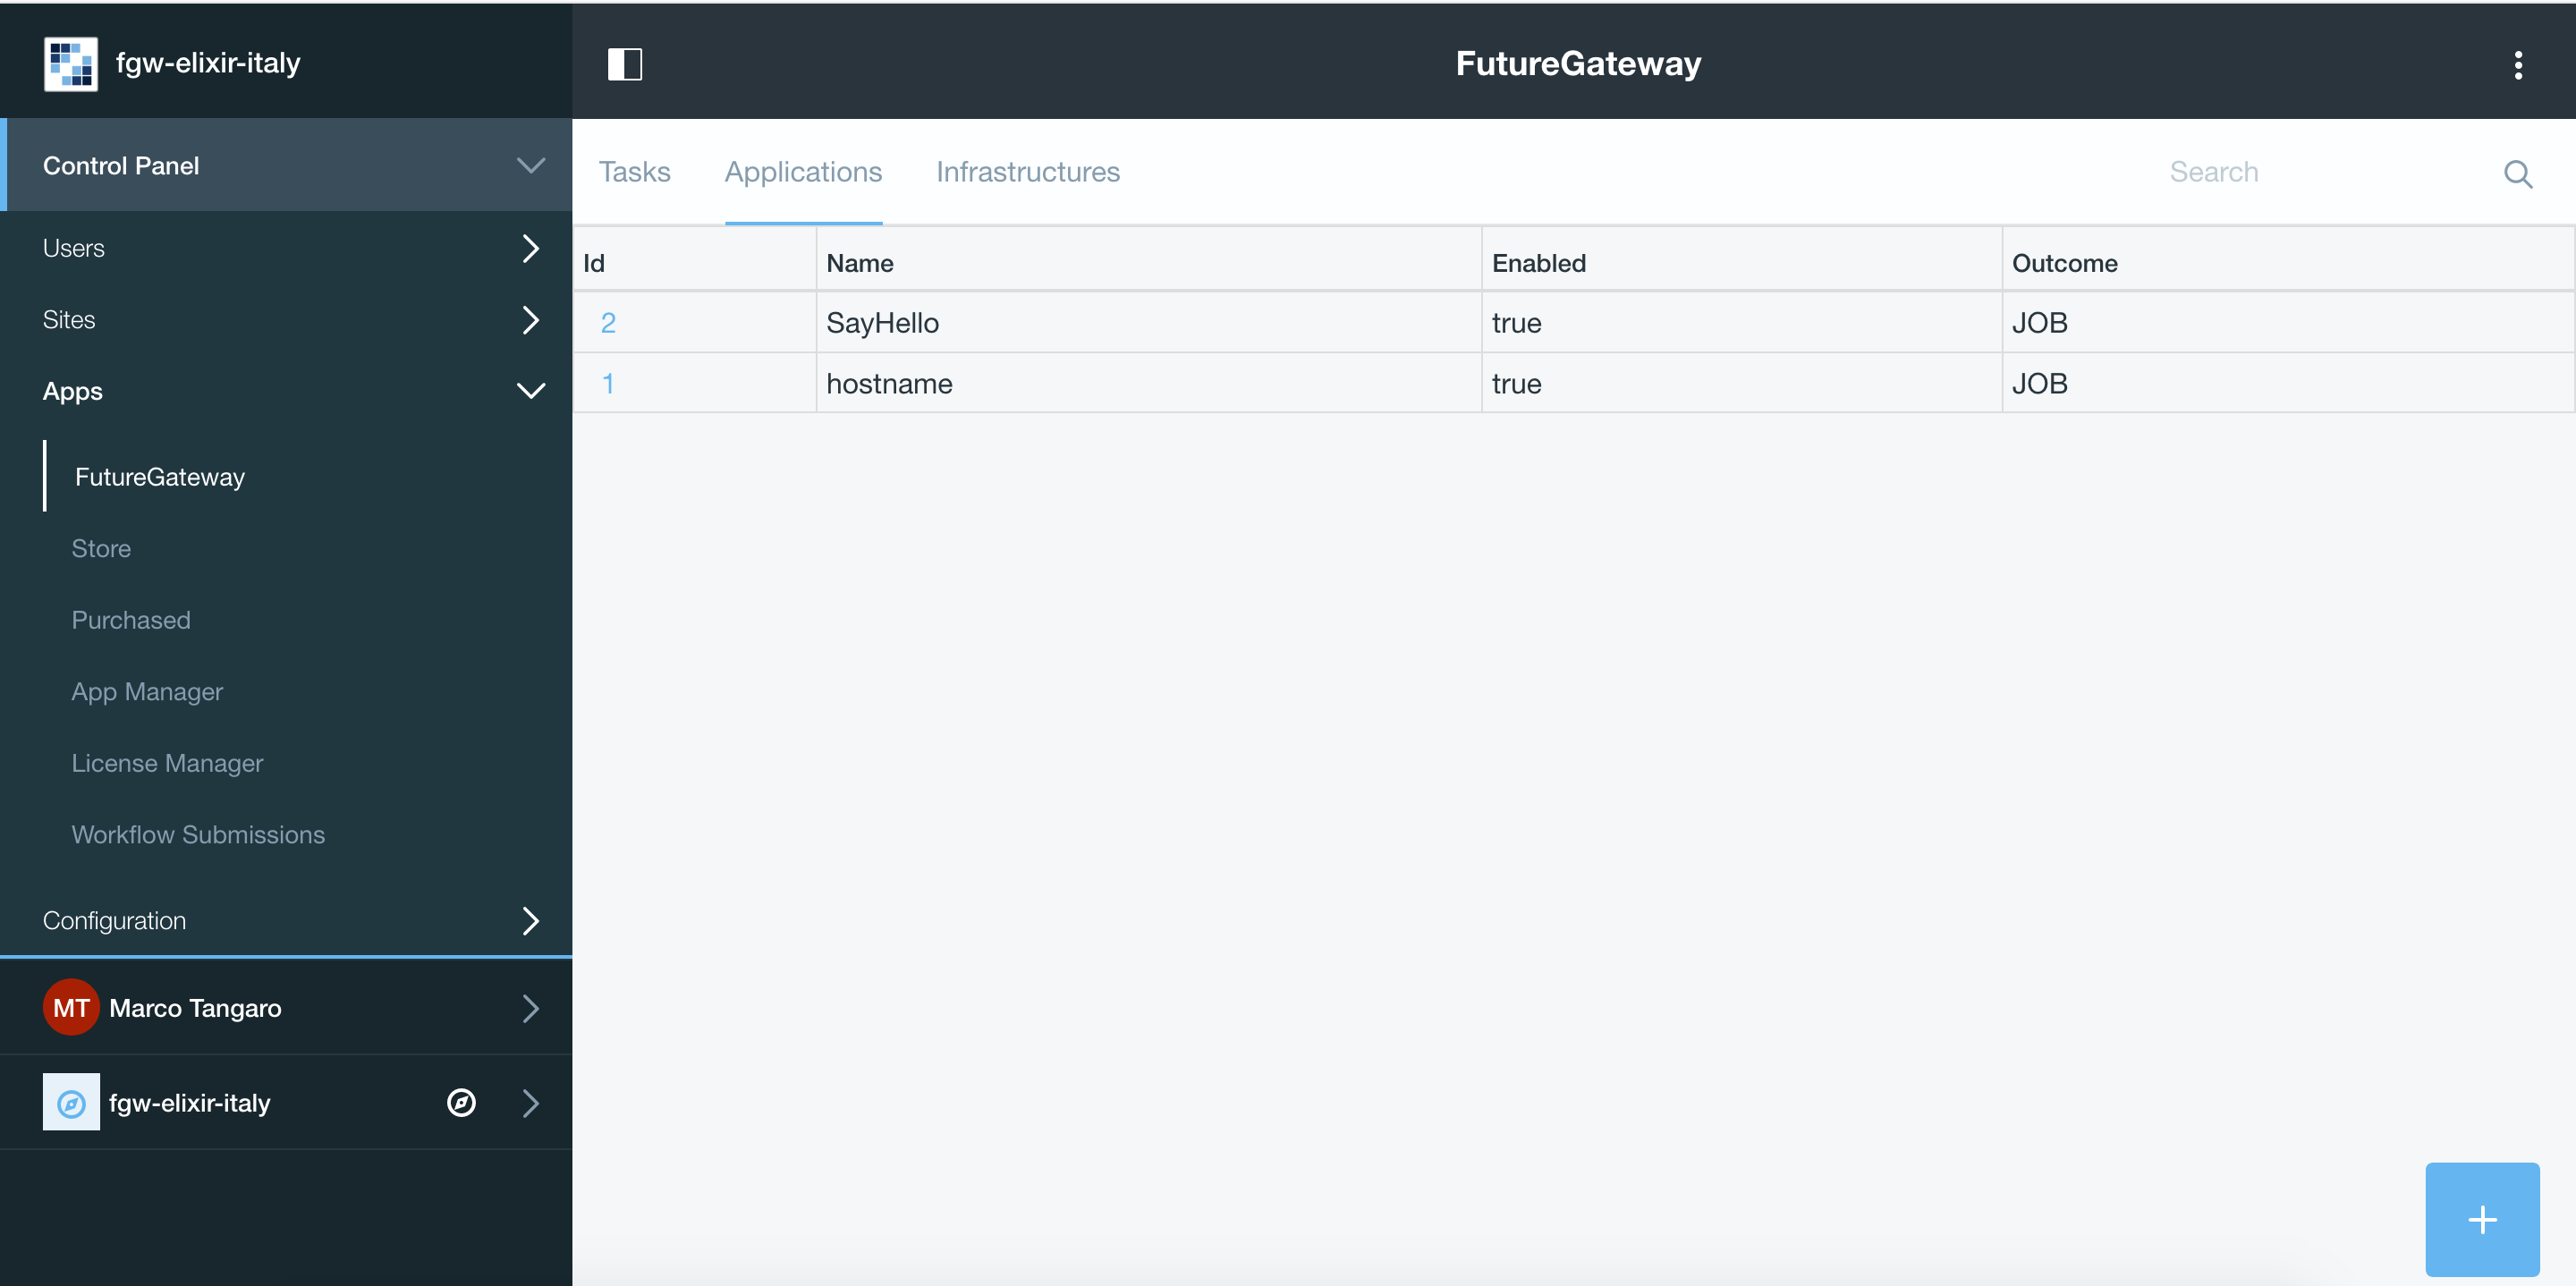
Finally, going in the FutureGateway admin portlet you should see:
Portlet configuration
Create build environment
To correctly build FutureGateway portlets we recommends to use Ubuntu 16.04
Java 8 and gradle are needed:
# apt-get install gradle
Install Blade cli: https://dev.liferay.com/develop/tutorials/-/knowledge_base/7-0/installing-blade-cli
The linux version of the liferay portal is available here: https://sourceforge.net/projects/lportal/files/Liferay%20Workspace/1.5.0.1/LiferayWorkspace-1.5.0.1-linux-x64-installer.run
$ chmod +x LiferayWorkspace-1.5.0.1-linux-x64-installer.run

$ ./LiferayWorkspace-1.5.0.1-linux-x64-installer.run
Answer [2] Don't initialize Liferay Workspace directory
and continue the installation.
Build portlets
Next you should use some code lines like below:
blade init liferay-workspace

cd ./liferay-workspace

git clone https://github.com/indigo-dc/LiferayPlugIns modules/

cd ./modules

git checkout remotes/origin/nonofficial # to build nonofficial portlets

blade gw clean jar
Newly created portlets are in ./modules/LIB_NAME/build/libs.
Next you need copy created jars to ~/FutureGateway/deploy and portlets are available on the your website.
Update to Java 8 - Appendix A
sudo apt-get purge openjdk*

sudo add-apt-repository ppa:webupd8team/java

sudo apt-get update

sudo apt-get install oracle-java8-installer
log-out and log-in to refresh environment variables.
Configure Apache for http - Appendix B
Enalble http_proxy on apache2
a2enmod proxy_http
In /etc/apach2/sites-available/ create your futuregateway.conf file, setting
ServerName <your_serve_name>

...
then enable FGW:
a2ensite futuregateway.conf
and reload apache:
# service apache2 reload
Import Signed CA - Appendix C
To import the SSL certificate you have to
Install the ca-certificates package:
# yum install ca-certificatesAdd the certificate as a new file to
# cp path/to/goagent/local/CA.crt /usr/local/share/ca-certificates/cert.crtUse command:
# update-ca-certificates
Import Signed CA in Java keystore - Appendix D
If IAM is under https but Tomcat log ($CATILINA_HOME/webapps/APIServerDaemon/WEB-INF/logs/APIServerDaemon.log) is showing:
...
23:03:55,675 ERROR [http-nio-8080-exec-13][IAMEndPoints:69] IAM Configuration URL 'https://indigoiam.cloud.ba.infn.it/.well-known/openid-configuration' is not reachable
...
you have to import your https certificate in java keystore [*]:
# apt-get install ca-certificates-java

# keytool -import -file /path/to/crt/file/file.crt -storepass changeit -keystore $JAVA_HOME/lib/security/cacerts -alias mycert
To list java certificates:
$ keytool -list -storepass changeit -keystore $JAVA_HOME/lib/security/cacerts
You can install it in /etc/ssl/certs to make curl work, too.
Create https certificate - Appendix E
You can install the certbot tool on your machine (1st approach) or you can use the docker image certbot/certbot (2nd approach).
Install certbot tool (https://certbot.eff.org/#ubuntuxenial-other)
$ sudo apt-get install software-properties-common
$ sudo add-apt-repository ppa:certbot/certbot
$ sudo apt-get update
$ sudo apt-get install certbot
$ sudo certbot certonly --standalone -d $HOSTNAME

The certificates should be in:
$ sudo ls /etc/letsencrypt/live/$HOSTNAME
cert.pem  chain.pem  fullchain.pem  privkey.pem  README
or
$ sudo docker run -it --rm -p 80:80 -p 443:443 -v /etc/letsencrypt:/etc/letsencrypt/  certbot/certbot certonly --standalone -d $HOSTNAME
The certificates should be in:
$ sudo ls /etc/letsencrypt/live/$HOSTNAME
cert.pem  chain.pem  fullchain.pem  privkey.pem  README
Fix ghost deployment issue
Open mysql FGW database:
mysql -h localhost -P 3306 -u fgapiserver -pfgapiserver_password fgapiserver

mysql> select f1.id, f2.id, f1.name from fg_user f1 join fg_user f2 on f1.name = f2.name where f1.id <> f2.id;
+----+----+--------------------------------------+
| id | id | name                                 |
+----+----+--------------------------------------+
|  6 |  5 | c0b907df-43a3-4c8a-952a-2b5ca56ec43e |
|  5 |  6 | c0b907df-43a3-4c8a-952a-2b5ca56ec43e |
|  8 |  7 | 9c3c7f53-7279-4008-82be-60600418c884 |
|  7 |  8 | 9c3c7f53-7279-4008-82be-60600418c884 |
+----+----+--------------------------------------+
4 rows in set (0.00 sec)
Suppose you want to delete user id = 6, which is showing you double entries (note that in this particular case we deleted both id=6 and id=8 which were our double entries, keeping id=5 and id=7):
mysql> delete from fg_user_group where user_id = 6;
Query OK, 1 row affected (0.04 sec)

mysql> delete from fg_user where id=6;
Query OK, 1 row affected (0.01 sec)
Then you can add unique contraint to prevent double entries:
mysql> alter table fg_user add unique(name);
Query OK, 0 rows affected (0.50 sec)
Records: 0  Duplicates: 0  Warnings: 0
Logs
You can easily access to logs with symlinks:
ln -s /home/futuregateway/FutureGateway/apache-tomcat-8.0.36/webapps/APIServerDaemon/WEB-INF/logs/APIServerDaemon.log logs-apiserverdaemon.log
ln -s /home/futuregateway/FutureGateway/fgAPIServer/fgapiserver.log logs-fgapiserver.log
ln -s /home/futuregateway/FutureGateway/apache-tomcat-8.0.36/logs/catalina.out logs-tomcat-catalina.out
References
GitBook: https://www.gitbook.com/book/indigo-dc/futuregateway/details