Galaxy production environment
Laniakea allows to setup and launch a virtual machine (VM) configured with the Operative System (CentOS 7 or Ubuntu 16.04) and the auxiliary applications needed to support a Galaxy production environment such as PostgreSQL, Nginx, uWSGI and Proftpd and to deploy the Galaxy platform itself. A common set of Reference data is available through a CernVM-FS volume. Once deployed each Galaxy instance can be further customized with tools and reference data.
The Galaxy production environment is deployed according to Galaxy official documentation: https://docs.galaxyproject.org/en/latest/admin/production.html.

OS support
CentOS 7 is our default distribution, Given its adherence to Standards and the length of official support (CentOS-7 updates until June 30, 2024, https://wiki.centos.org/FAQ/General#head-fe8a0be91ee3e7dea812e8694491e1dde5b75e6d). CentOS 7 and Ubuntu 16.04 are both supported.
Warning
Selinux is by default disabled on CentOS.
PostgresSQL
PostgreSQL packages coming from PostgreSQL official repository are installed:
Note
Current installed PostgreSQL is: PostgreSQL 9.6
Distribution |
Repository |
|---|---|
Centos |
|
Ubuntu |
On CentOS 7 the default pgdata directory is /var/lib/pgsql/9.6/data. The pg_hba.conf configuration is modified allowing for password authentication. On CentOS we need to exclude CentOS base and updates repo for PostgreSQL, otherwise dependencies might resolve to the postgresql supplied by the base repository.
On Ubuntu default pgdata directory is /var/lib/postgresql/9.6/main, while the configuration files are stored in /etc/postgresql/9.6/main. There’s no need to modify the HBA configuration file since, by default, it is allowing password authentication.
PostgreSQL start/stop/status in entrusted to Systemd on CentOS 7 and Ubuntu Xenial.
Distribution |
Command |
|---|---|
CentOS 7 |
sudo systemctl start/stop/status postgres-9.6 |
Ubuntu Xenial |
sudo systemctl start/stop/status postgresql |
Galaxy database configuration
Two different database are configured to track data and tool shed install data, e.g. allowing to bootstrap fresh Galaxy instance with pretested installs.
The database passwords are randomly generated and the passoword can be retrieved in the galaxy.yml file.
Galaxy database is named galaxy and is configured in the galaxy.yml file:
database_connection = postgresql://galaxy:gtLxNnH7DpISmI5FXeeI@localhost:5432/galaxy
The shed install tool database is named galaxy_tools and is configured as:
install_database_connection = postgresql://galaxy:gtLxNnH7DpISmI5FXeeI@localhost:5432/galaxy_tools
PostgresSQL troubleshooting
With the recents update (October 2019) the package python2-psycopg2 requires postgresql12-libs, resulting in a broken environment since the package is not available.
We avoid this behaviour excluding python pytho2-psycopg2 update in /etc/yum.conf file with the line exclude=python2-psycopg2.
If you need to update it, just remove it from the exclude line in /etc/yum.conf.
Docker configuration
On Docker container PostgreSQL cannot be managed through systemd/upstart, since there’s no init system on CentOS and Ubuntu docker images.
Therefore, the system is automatically configured to run postgresql using supervisord.
NGINX
To improve Galaxy performance, NGINX is used as web server. The official Galaxy nginx packages are used by default (built in upload module support).
Distribution |
Repository |
|---|---|
Centos |
|
Ubuntu |
ppa:galaxyproject/nginx |
Moreover, on Ubuntu, we need to prevent NGINX to be updated by apt default packages. For this purpose the pin priority of NGINX ppa packages is raised, by editing /etc/apt/preferences.d/galaxyproject-nginx-pin-700 (more on apt pinning at: https://wiki.debian.org/AptPreferences).
NGINX is configured following the official Galaxy wiki: https://galaxyproject.org/admin/config/nginx-proxy/.
NGINX is started, usually using systemd:
$ sudo systemctl start nginx
NGINX options
NGINX options are listed here: https://www.nginx.com/resources/wiki/start/topics/tutorials/commandline/
To start/stop/status NGINX with systemd:
Dstribution |
Command |
|---|---|
CentOS 7 |
sudo systemctl start/stop/status nginx |
Ubuntu Xenial |
sudo systemctl start/stop/status nginx |
NGINX troubleshooting
Running NGINX on CentOS through systemd could lead to this error in /var/log/nginx/error.log, which can prevent Galaxy web page loading:
2017/08/24 08:22:32 [crit] 3320#0: *7 connect() to 127.0.0.1:4001 failed (13: Permission denied) while connecting to upstream, client: 192.167.91.214, server: localhost, request: "GET /galaxy HTTP/1.1", upstream: "uwsgi://127.0.0.1:4001", host: "90.147.102.159"
This is related to SELinux policy on CentOS.
Warning
You should avoid to modify SELinux policy, since you can still use NGINX command line options.
Anyway, the problem is that selinux dany socket access. This results in a generic access denied error in NGINX’s log, the important messages are actually in selinux’s audit log. To solve this issue, you can ran the following commands as superuser.
# show the new rules to be generated
grep nginx /var/log/audit/audit.log | audit2allow

# show the full rules to be applied
grep nginx /var/log/audit/audit.log | audit2allow -m nginx

# generate the rules to be applied
grep nginx /var/log/audit/audit.log | audit2allow -M nginx

# apply the rules
semodule -i nginx.pp
Then restart NGINX.
You may need to generate the rules multiple times (likely four times to fix all policies), trying to access the site after each pass, since the first selinux error might not be the only one that can be generated.
Further readings
uWSGI
uWSGI (https://uwsgi-docs.readthedocs.io/en/latest) is used as interface between the web server (i.e. NGINX) and the web application (i.e. Galaxy). Using uWSGI for production servers is recommended by the Galaxy team: https://galaxyproject.org/admin/config/performance/scaling/
uWSGI configuration is embedded in the galaxy.yml file ($HOME/galaxy/config/galaxy.yml), and by default foresee 4 handler configuration.
The number of processes (i.e. uWSGI workers) is set to number_of_virtual_cpus - 1. This configuration should be fine for most uses. Nevertheless, there’s no golden rule to define the workers number. It is up to the end-user to configure it dependig on your needs. The same goes for the number of job handlers (4 by default).
uWSGI socket and stats server are, by default, listening on 127.0.0.1:4001 and 127.0.0.1:9191, respectively. More on the uWSGI stats server here: http://uwsgi-docs.readthedocs.io/en/latest/StatsServer.html?highlight=stats%20server.
enable-threads: true
socket: 127.0.0.1:4001
manage-script-name: True
stats: 127.0.0.1:9191
logto: /var/log/galaxy/uwsgi.log
no-orphans: true
Proftpd
To allow user to upload files (> 2GB) through FTP, Proftpd is installed and configured on each Galaxy server, according to: https://galaxyproject.org/admin/config/upload-via-ftp/
Proftpd configuration file is located at /etc/proftdp.conf on CentOS and /etc/proftpd/proftpd.conf on Ubuntu.
To grant a user access to read emails and passwords from the Galaxy database, a separate user is created for the FTP server which has permission to SELECT from the galaxy_user table and nothing else.
Proftpd is listening on port 21. FTP protocol is not encrypted by default, thus any usernames and passwords are sent over clear text to Galaxy.
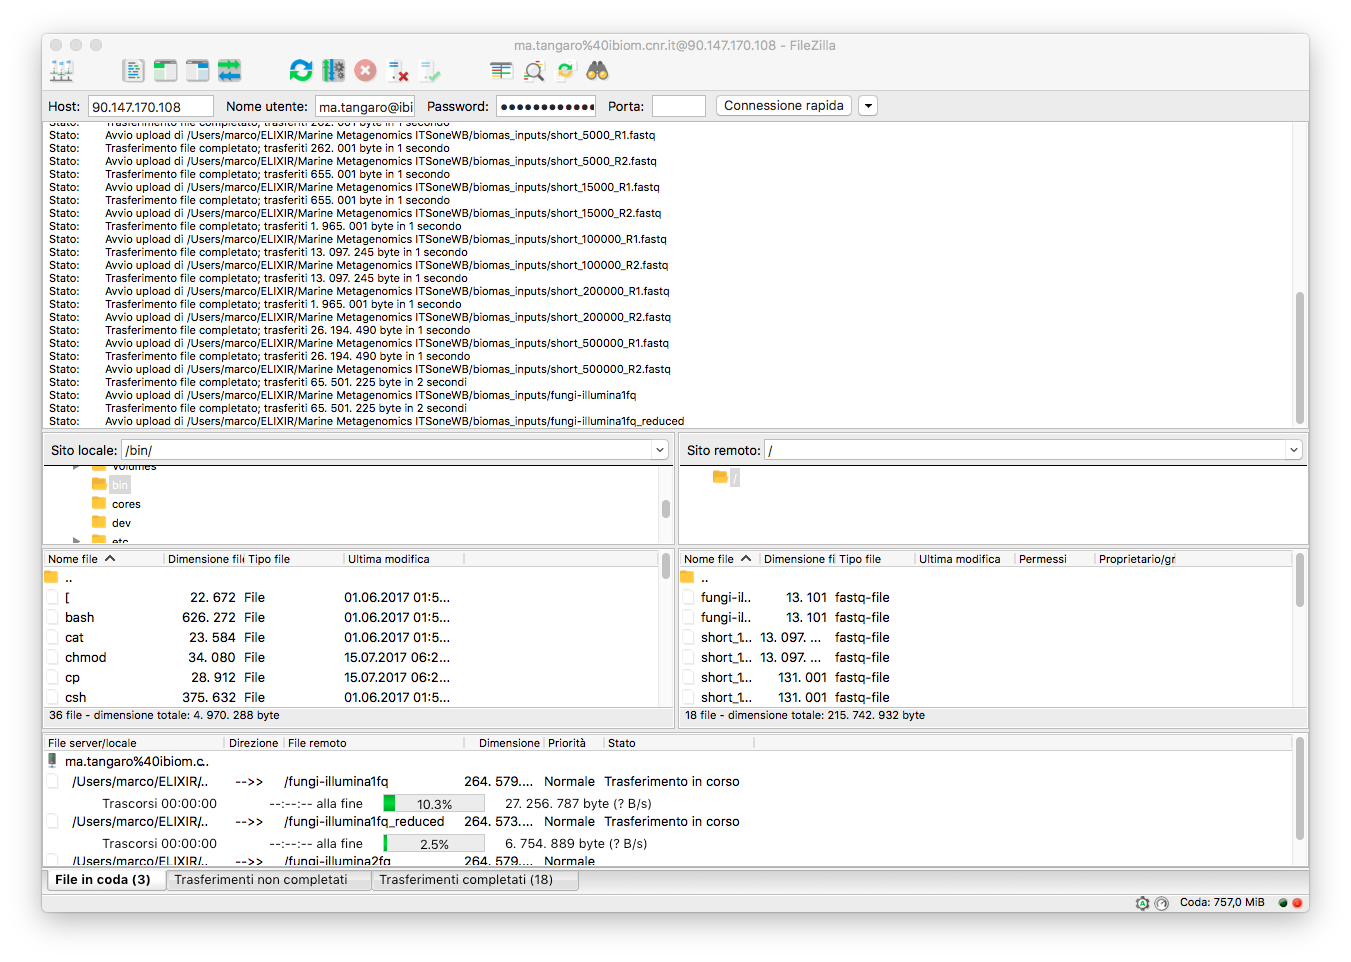
How to use FTP through FileZilla
Open FileZilla and configure it with:
Host: Galaxy ip address (e.g. 90.147.170.108), without the
/galaxy.User name: your e-mail address on Galaxy.
Password: your password on Galaxy.
Port: 21
How to use FTP through command line
To install FTP command line client, type sudo yum install ftp on CentOS or sudo apt-get install ftp on Ubuntu.
To establish a connection with Glaxy Proftpd server, you can use your Galaxy username and password, in addition to the server IP address you’re connecting to (e.g. 90.147.102.82). To open a connection in Terminal type the following command, replacing the IP address with your server IP address:
$ ftp 90.147.102.82
Connected to 90.147.102.82.
220 ProFTPD 1.3.5e Server (galaxy ftp server) [::ffff:90.147.102.82]
Name (90.147.102.82:marco):
Then login with your Galaxy credentials, typing your Galaxy e-mail address and password:
$ ftp 90.147.102.82
Connected to 90.147.102.82.
220 ProFTPD 1.3.5e Server (galaxy ftp server) [::ffff:90.147.102.82]
Name (90.147.102.82:marco): ma.tangaro@gmail.com
331 Password required for ma.tangaro@gmail.com
Password:
To upload file to your Galaxy remote directory:
ftp> put Sc_IP.fastq
local: Sc_IP.fastq remote: Sc_IP.fastq
229 Entering Extended Passive Mode (|||30023|)
150 Opening BINARY mode data connection for Sc_IP.fastq
8% |******                                                                           | 12544 KiB   23.84 KiB/s  1:31:23 ETA
Then you will find it on Galaxy:

Here’s a list of the basic commands that you can use with the FTP client.
Command |
Description |
|---|---|
ls |
ls the current directory on the remote machine. |
cd |
to change directory on the remote machine. |
pwd |
to find out the pathname of the current directory on the remote machine. |
delete |
to delete (remove) a file in the current remote directory (same as rm in UNIX). |
mkdir |
to make a new directory within the current remote directory. |
rmdir |
to remove (delete) a directory in the current remote directory. |
get |
to copy one file from the remote machine to the local machine |
|
|
|
|
mget |
to copy multiple files from the remote machine to the local machine; you are prompted for a y/n answer before transferring each file. |
put |
to copy one file from the local machine to the remote machine. |
mput |
to copy multiple files from the local machine to the remote machine; you are prompted for a y/n answer before transferring each file. |
quit |
to exit the FTP environment (same as bye). |
Supervisord
Supervisor is a process manager written in Python, which allows its users to monitor and control processes on UNIX-like operating systems. It includes:
- Supervisord daemon (privileged or unprivileged);
- Supervisorctl command line interface;
- INI config format;
- [program:x] defines a program to control.
Supervisord requires root privileges to run.
Galaxy supervisord configuration is located here and here.
A configuration running the Galaxy server under uWSGI has been installed on /etc/supervisord.d/galaxy_web.ini on CentOS, while it is located on /etc/supervisor/conf.d/galaxy.conf on Ubuntu.
The options stopasgroup = true and killasgroup = true ensure that the SIGINT signal, to shutdown Galaxy, is propagated to all uWSGI child processes (i.e. to all uWSGI workers).
PYTHONPATH is not specified in this configuration since it was conflicting with Conda.
To manage Galaxy through supervisord:
Action |
Command |
|---|---|
Start Galaxy |
sudo supervisorctl start galaxy: |
Stop Galaxy |
sudo supervisorctl stop galaxy: |
Restart Galaxy |
sudo supervisorctl restart galaxy: |
Galaxy status |
sudo supervisorctl status galaxy: |
$ supervisorctl help

default commands (type help <topic>):
=====================================
add    clear  fg        open  quit    remove  restart   start   stop  update
avail  exit   maintail  pid   reload  reread  shutdown  status  tail  version
$ sudo supervisorctl status galaxy:
galaxy:galaxy_web                RUNNING   pid 9030, uptime 2 days, 21:19:28
galaxy:handler0                  RUNNING   pid 9031, uptime 2 days, 21:19:28
galaxy:handler1                  RUNNING   pid 9041, uptime 2 days, 21:19:27
galaxy:handler2                  RUNNING   pid 9046, uptime 2 days, 21:19:26
galaxy:handler3                  RUNNING   pid 9055, uptime 2 days, 21:19:25
galaxy_web.ini file configuration:
[program:galaxy_web]
command         = /home/galaxy/galaxy/.venv/bin/uwsgi --virtualenv /home/galaxy/galaxy/.venv --ini-paste /home/galaxy/galaxy/config/galaxy.ini --pidfile /var/log/galaxy/uwsgi.pid
directory       = /home/galaxy/galaxy
umask           = 022
autostart       = true
autorestart     = true
startsecs       = 20
user            = galaxy
environment     = PATH="/home/galaxy/galaxy/.venv/bin:/usr/local/sbin:/usr/local/bin:/usr/sbin:/usr/bin:/sbin:/bin"
numprocs        = 1
stopsignal      = INT
startretries    = 15
stopasgroup     = true
killasgroup     = true

[program:handler]
command         = /home/galaxy/galaxy/.venv/bin/python ./lib/galaxy/main.py -c /home/galaxy/galaxy/config/galaxy.ini --server-name=handler%(process_num)s --log-file=/var/log/galaxy/handler%(process_num)s.log
directory       = /home/galaxy/galaxy
process_name    = handler%(process_num)s
numprocs        = 4
umask           = 022
autostart       = true
autorestart     = true
startsecs       = 20
user            = galaxy
startretries    = 15

[group:galaxy]
programs = handler, galaxy_web
Finally, a systemd script has been installed to start/stop Supervisord on /etc/systemd/system/supervisord.service.
Action |
Command |
|---|---|
Start |
sudo systemctl start supervisord.service |
Stop |
sudo systemctl stop supervisord.service |
Restart |
sudo systemctl restart supervisord.service |
Status |
sudo systemctl status supervisord.service |
$ sudo systemctl status supervisord.service
  ● supervisord.service - Supervisor process control system for UNIX
   Loaded: loaded (/etc/systemd/system/supervisord.service; disabled; vendor preset: disabled)
   Active: active (running) since Sat 2017-08-12 08:48:33 UTC; 9s ago
     Docs: http://supervisord.org
 Main PID: 12204 (supervisord)
   CGroup: /system.slice/supervisord.service
           ├─12204 /usr/bin/python /usr/bin/supervisord -n -c /etc/supervisord.conf
           ├─12207 /home/galaxy/galaxy/.venv/bin/uwsgi --virtualenv /home/galaxy/galaxy/.venv --ini-paste /home/galaxy/galaxy/config/galaxy.ini --pidfile /var/log/galaxy/uwsgi.pid
           ├─12208 /home/galaxy/galaxy/.venv/bin/python ./lib/galaxy/main.py -c /home/galaxy/galaxy/config/galaxy.ini --server-name=handler0 --log-file=/var/log/galaxy/handler0.log
           ├─12209 /home/galaxy/galaxy/.venv/bin/python ./lib/galaxy/main.py -c /home/galaxy/galaxy/config/galaxy.ini --server-name=handler1 --log-file=/var/log/galaxy/handler1.log
           ├─12210 /home/galaxy/galaxy/.venv/bin/python ./lib/galaxy/main.py -c /home/galaxy/galaxy/config/galaxy.ini --server-name=handler2 --log-file=/var/log/galaxy/handler2.log
           └─12211 /home/galaxy/galaxy/.venv/bin/python ./lib/galaxy/main.py -c /home/galaxy/galaxy/config/galaxy.ini --server-name=handler3 --log-file=/var/log/galaxy/handler3.log

Aug 12 08:48:33 galaxy-indigo-test supervisord[12204]: 2017-08-12 08:48:33,805 CRIT Supervisor running as root (no user in config file)
Aug 12 08:48:33 galaxy-indigo-test supervisord[12204]: 2017-08-12 08:48:33,805 WARN Included extra file "/etc/supervisord.d/galaxy_web.ini" during parsing
Aug 12 08:48:34 galaxy-indigo-test supervisord[12204]: 2017-08-12 08:48:34,564 INFO RPC interface 'supervisor' initialized
Aug 12 08:48:34 galaxy-indigo-test supervisord[12204]: 2017-08-12 08:48:34,564 CRIT Server 'unix_http_server' running without any HTTP authentication checking
Aug 12 08:48:34 galaxy-indigo-test supervisord[12204]: 2017-08-12 08:48:34,565 INFO supervisord started with pid 12204
Aug 12 08:48:35 galaxy-indigo-test supervisord[12204]: 2017-08-12 08:48:35,569 INFO spawned: 'galaxy_web' with pid 12207
Aug 12 08:48:35 galaxy-indigo-test supervisord[12204]: 2017-08-12 08:48:35,573 INFO spawned: 'handler0' with pid 12208
Aug 12 08:48:35 galaxy-indigo-test supervisord[12204]: 2017-08-12 08:48:35,576 INFO spawned: 'handler1' with pid 12209
Aug 12 08:48:35 galaxy-indigo-test supervisord[12204]: 2017-08-12 08:48:35,581 INFO spawned: 'handler2' with pid 12210
Aug 12 08:48:35 galaxy-indigo-test supervisord[12204]: 2017-08-12 08:48:35,584 INFO spawned: 'handler3' with pid 12211
Paths
User data are automatically stored to the “/export” directory, where an external (standard block storage) volume is mounted.
All Galaxy job results are stored in this directory through galaxy.yml (galaxy.ini on galaxy < 18.01) configuration file. For instance, the files directory is located:
# Dataset files are stored in this directory.
file_path = /export/galaxy/database/files
while the job working directory is located:
# Each job is given a unique empty directory as its current working directory.
# This option defines in what parent directory those directories will be
# created.
job_working_directory = /export/job_work_dir
Here is the list of Galaxy database path directories:
file_path = /export/galaxy/database/files
job_working_directory = /export/job_work_dir
new_file_path = /export/galaxy/database/tmp
template_cache_path = /export/galaxy/database/compiled_templates
citation_cache_data_dir = /export/galaxy/database/citations/data
citation_cache_lock_dir = /export/galaxy/database/citations/lock
whoosh_index_dir = /export/galaxy/database/whoosh_indexes
object_store_cache_path = /export/galaxy/database/object_store_cache
cluster_file_directory = /export/galaxy/database/pbs"
ftp_upload_dir = /export/galaxy/database/ftp
Enable Dockerized tools support in job_conf.xml
Different job_conf.xml configurations to exploit Dockerized tools can be here.